In this article, you will learn how to manage your Logmaster's active vehicles. The sections below will walk you through each feature and function. Click on the appropriate links to jump into the desired topic:
- Add Vehicles
- View Active Vehicles List
- View Vehicles
- Edit Vehicles
- Disable Vehicles
- Mark Defected Vehicles
- Mass
- Move Vehicle
- Add Vehicle Configuration
- Download All Vehicles
- View Vehicles - Mass Compliance
- Vehicles - Mass Compliance Add/Remove Axle Groups
- Generate Vehicle Reports
- Import Vehicles
- Download Vehicle CSV Template
Add Vehicles
This section will guide you on how to add new vehicles to your Logmaster account.
- In the Business Navigation Menu, click Vehicles and select Vehicles List.
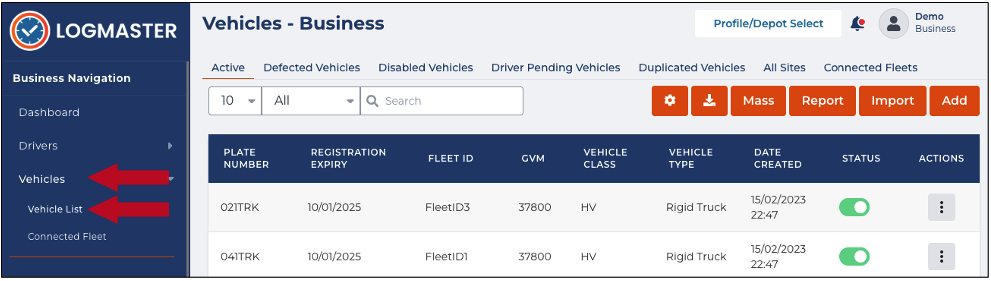
- You will be directed to the Vehicles—Business page. When you access this page, the Active tab is open by default.
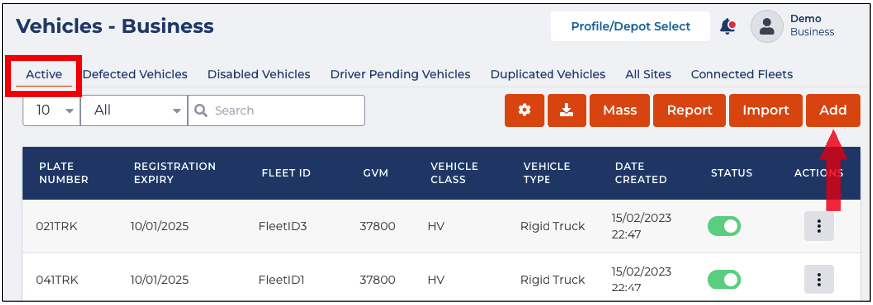
- Find and click the Add button to access the Add Vehicle window.
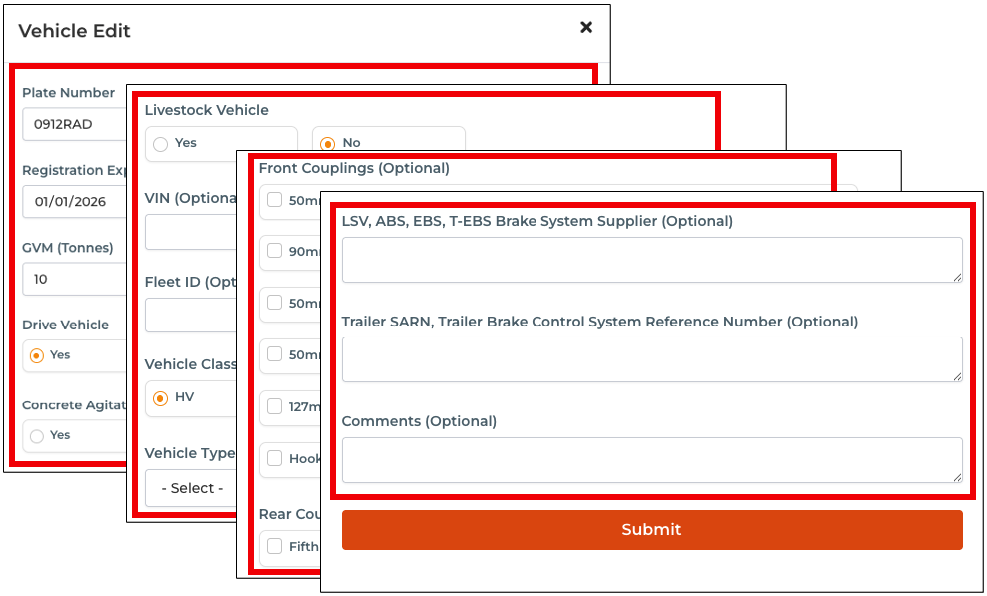
- In the Add Vehicle window, specify the following information:
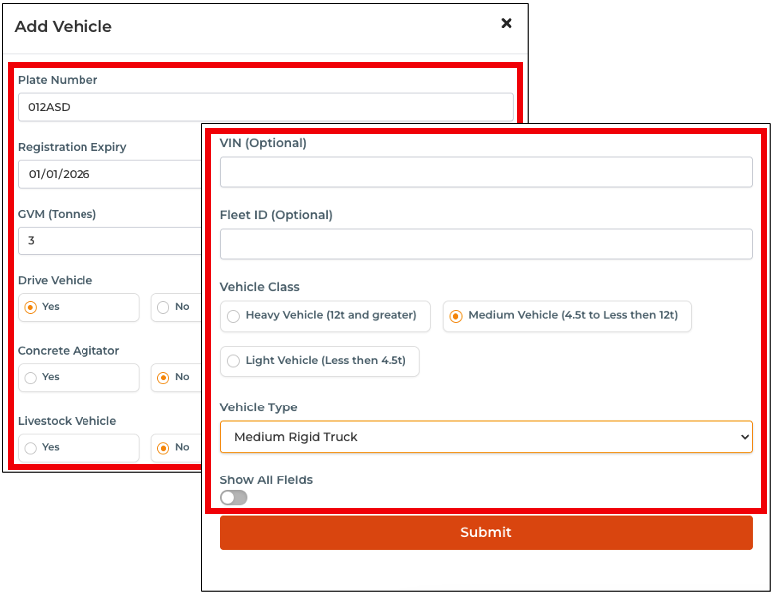 FieldInstructions
Plate Number Enter the Vehicle Plate Number. Registration Expiry Specify the registration expiration date by clicking the Calendar icon and setting the date manually. GVM (Tonnes) Enter the Gross Vehicle Mass in tonnes. Drive Vehicle Click the radio button of the appropriate value. Concrete Agitator Click the radio button of the appropriate value. Livestock Vehicle Click the radio button of the appropriate value. VIN (Optional) Enter the Vehicle Identification Number. Fleet ID (Optional) Enter the Vehicle's fleet ID. Vehicle Class Click the radio button of the appropriate value. Vehicle Type Click the drop-down arrow to select the vehicle type. Show All FieldsEnabling this option will display all configuration fields including: - Front Couplings (Optional)
- Rear Couplings (Optional)
- Power Couplings (Optional)
- Brake System Type (Optional)
- Brake Foundation (Optional)
- Supply Voltage to Trailer (Optional)
- Suspension (Optional)
- LSV, ABS, EBS, T-EBS Brake System Supplier (Optional)
- Trailer SARN, Trailer Brake Control System Reference Number (Optional)
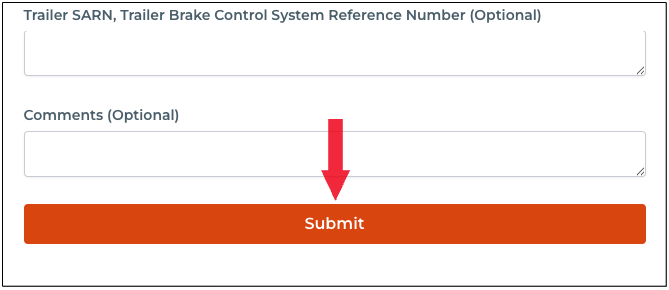
- Comments (Optional)
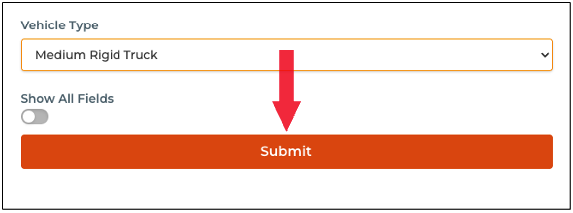
- After specifying the vehicle details, click the Submit button to add the vehicle.


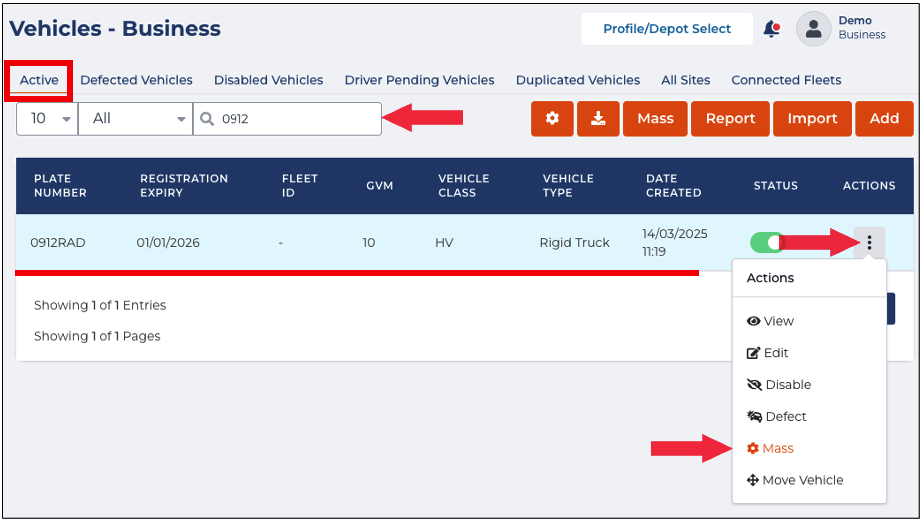
View Active Vehicles List
This section will guide you through accessing and viewing the active vehicles list, which provides vehicle information at a glance.
- In the Business Navigation Menu, click Vehicles and select Vehicles List.
- You will be directed to the Vehicles - Business page. When you access this page, the Active tab is open by default.
- The Active tab displays the list of vehicles with the following information:
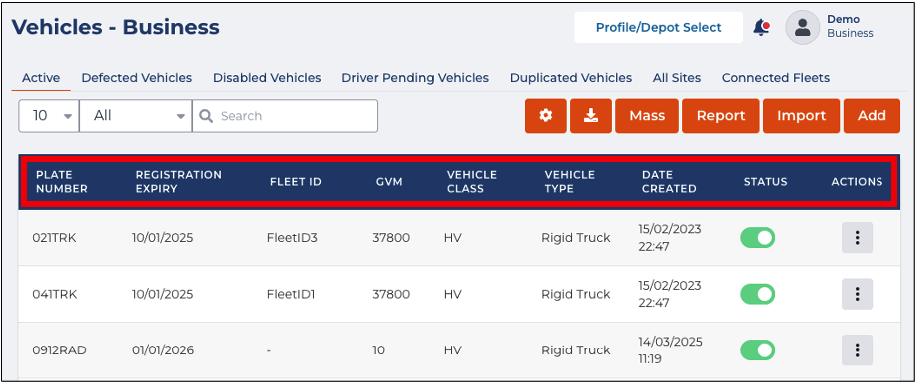
- Plate Number
- Registration Expiry
- Fleet ID
- GVM (Gross Vehicle Mass)
- Vehicle Class
- Vehicle Type
- Date Created Status
- You can also filter the vehicles by Non-Drive and Drive filters and use the Search field to narrow your search. Lastly, you can set the display to show the number of vehicles by 10, 20, or 50.

View Vehicles
This section will guide you in viewing a particular vehicle and accessing all its information.
- In the Business Navigation Menu, click Vehicles and select Vehicles List.
- You will be directed to the Vehicles - Business page. When you access this page, the Active tab is open by default.
- Search/filter the list using the Search field to view active vehicles. You can also set the list display to 10, 20, or 50 using the drop-down arrow beside the Search field.
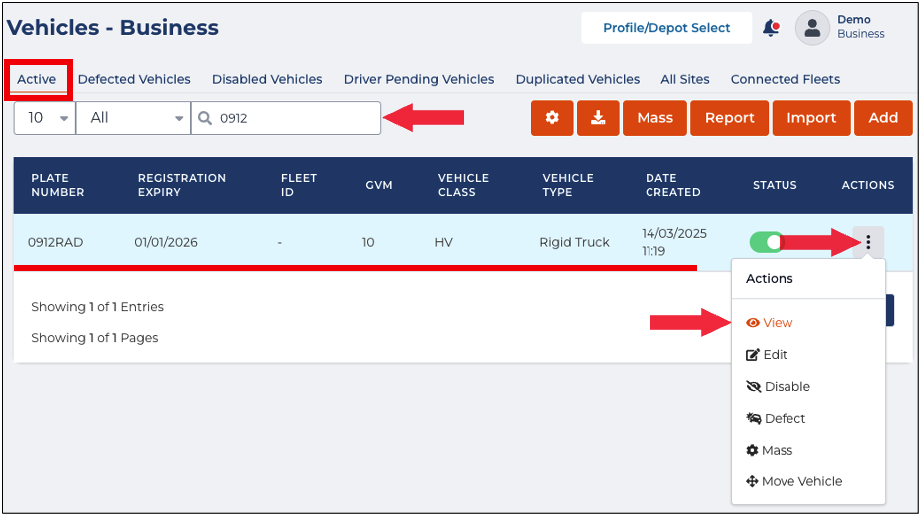
- Find the vehicle from the list and click its Action icon. The Actions menu will expand, select View.
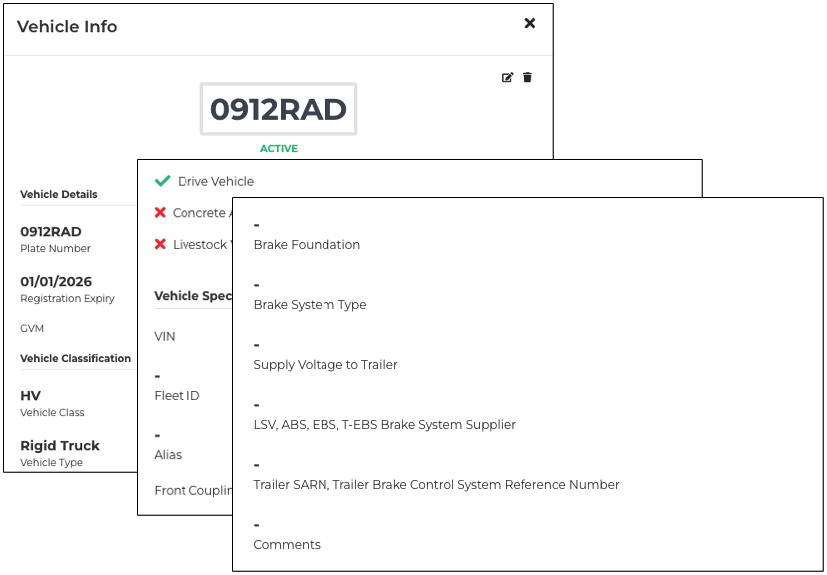
- The Vehicle Info window will appear displaying the Vehicle's details. In this window, you can view the vehicle's information, and edit or delete it.


Edit Vehicles
This section will guide you on how to update existing vehicles.
- In the Business Navigation Menu, click Vehicles and select Vehicles List.
- You will be directed to the Vehicles - Business page. When you access this page, the Active tab is open by default.
- Search/filter the list using the Search field to view active vehicles. You can also set the list display to 10, 20, or 50 using the drop-down arrow beside the Search field.
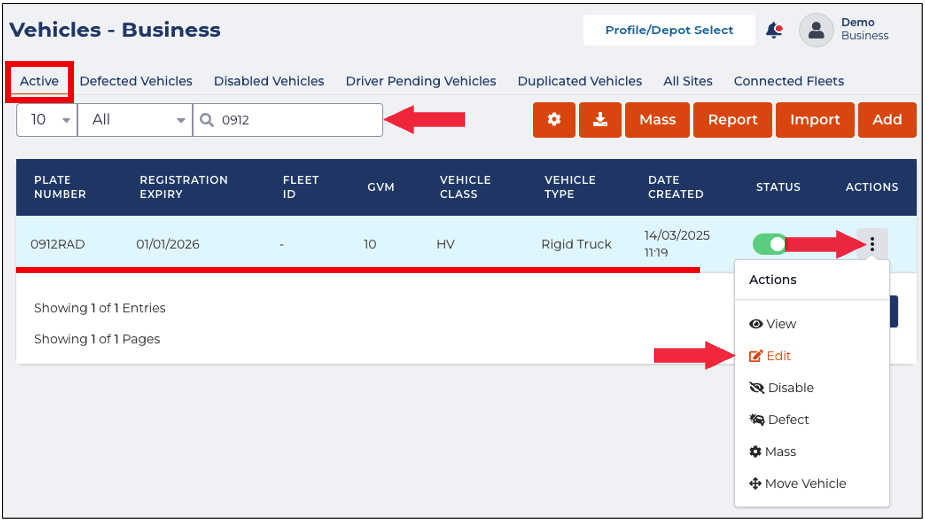
- Find the vehicle from the list and click its Action icon. The Actions menu will expand, select Edit.
- The Vehicle Edit window will appear. Update the appropriate information by changing its values.
- Review the updated information and click the Submit button to apply the changes.


Disable Vehicles
This section will guide you on how to disable vehicles. Once disabled, it will no longer appear in the Active tab as it will be moved to the Disabled Vehicles tab.
- In the BusinessNavigationMenu, click Vehicles and select VehiclesList.
- You will be directed to the Vehicles - Business page. When you access this page, the Active tab is open by default.
- Search/filter the list using the Search field to view active vehicles. You can also set the list display to 10, 20, or 50 using the drop-down arrow beside the Search field.

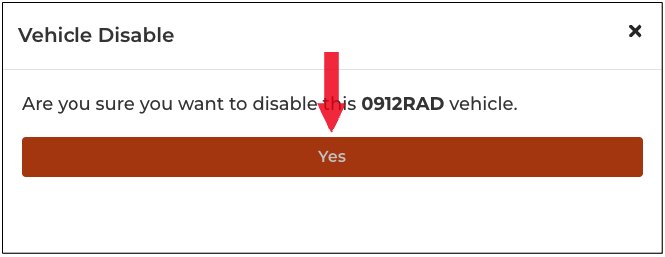
- Find the vehicle from the list and click its Action icon. The Actions menu will expand, select Disable.
- A Confirmation dialog box will appear. Click Yes to continue disabling the selected vehicle.


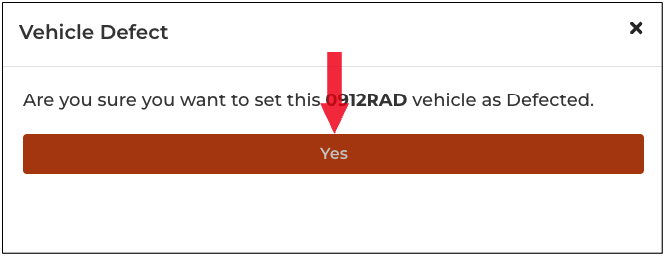
Mark Defected Vehicles
This section will guide you on how to mark defected vehicles. Once marked as defected, it will no longer appear in the Active tab. The marked vehicle will be moved to the Defected Vehicles tab.
- In the Business Navigation Menu, click Vehicles and select Vehicles List.
- You will be directed to the Vehicles - Business page. When you access this page, the Active tab is open by default.
- Search/filter the list using the Search field to view active vehicles. You can also set the list display to 10, 20, or 50 using the drop-down arrow beside the Search field.
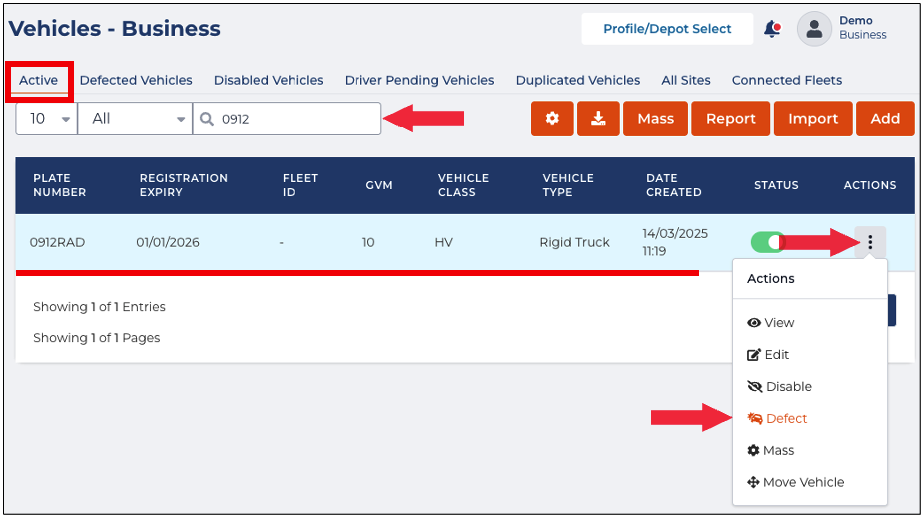
- Find the vehicle from the list and click its Action icon. The Actions menu will expand, select Defect.
- A Confirmation dialog box will appear. Click Yes to continue marking the selected vehicle as defective.


Configuring the Vehicle Mass
This section will guide you on how to configure the vehicle mass. The configuration includes the following:
- GML - General Mass Limits
- CML - Concessional Mass Limits
- HML - Higher Mass Limits
- In the BusinessNavigationMenu, click Vehicles and select VehiclesList.
- You will be directed to the Vehicles - Business page. When you access this page, the Active tab is open by default.
- Search/filter the list using the Search field to view active vehicles. You can also set the list display to 10, 20, or 50 using the drop-down arrow beside the Search field.
- Find the vehicle from the list and click its Action icon. The Actions menu will expand, select Mass.
- The Vehicle Mass Configuration window will appear. In the Steer and Drive sections, specify the following details for both sections:
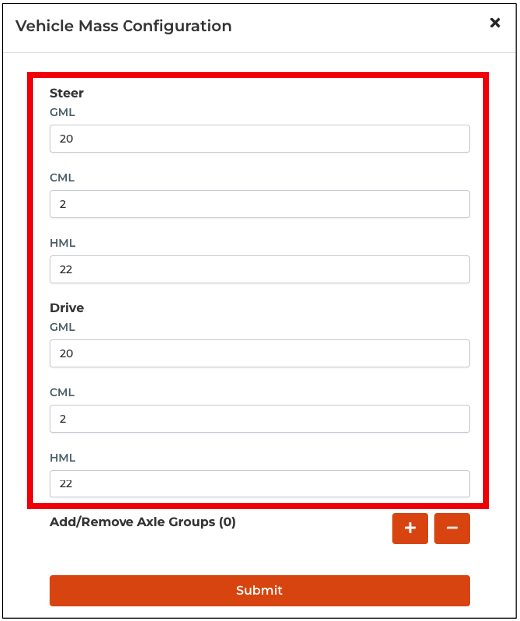
- GML - General Mass Limits
- CML - Concessional Mass Limits
- HML - Higher Mass Limits
- To add/remove axle groups, click the +/- button.
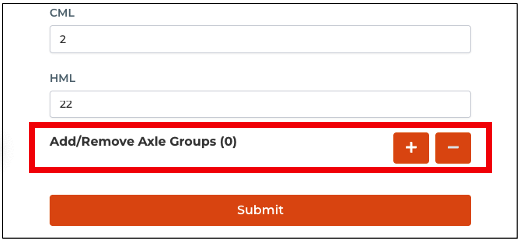
- When adding an axle group, specify the following:
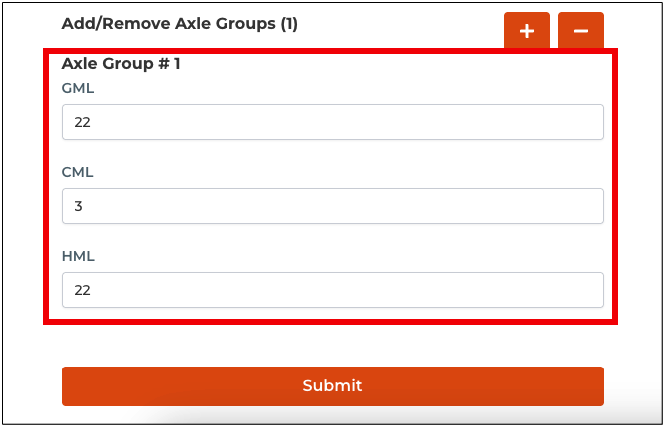
- GML - General Mass Limits
- CML - Concessional Mass Limits
- HML - Higher Mass Limits
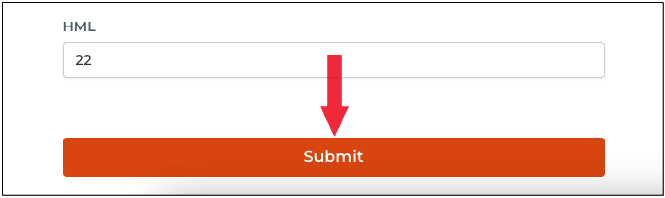
- After configuring the vehicle mass configuration, click the Submit button to apply the changes.


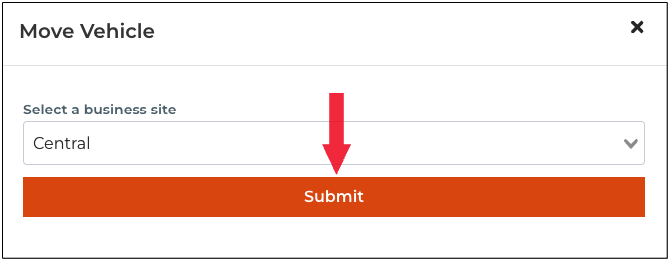
Move Vehicle to a Different Business Site
This section will guide you on how to move vehicles to a different business site.
- In the BusinessNavigationMenu, click Vehicles and select VehiclesList.
- You will be directed to the Vehicles - Business page. When you access this page, the Active tab is open by default.
- Search/filter the list using the Search field to view active vehicles. You can also set the list display to 10, 20, or 50 using the drop-down arrow beside the Search field.
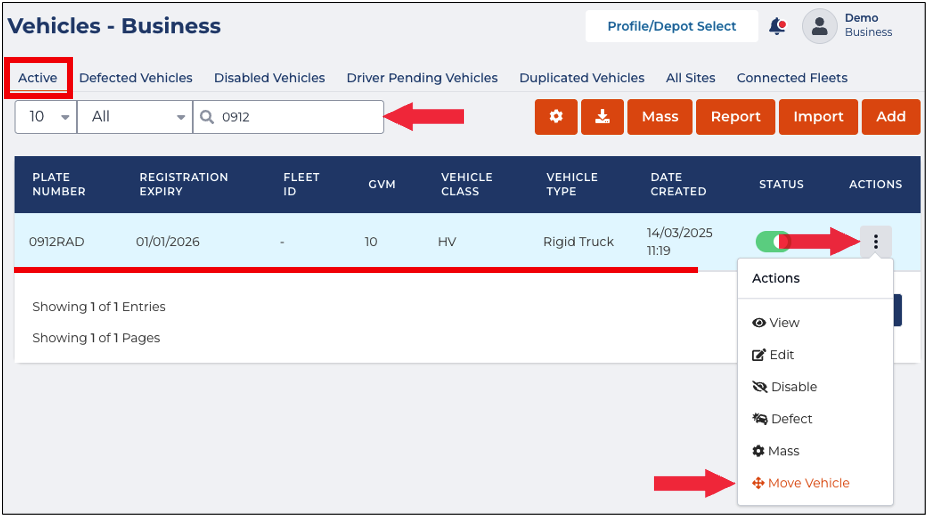
- Find the vehicle from the list and click its Action icon. The Actions menu will expand, select Move.
- A Move Vehicle dialog box will appear. Click the drop-down arrow to select the site to which you want to move the vehicle.
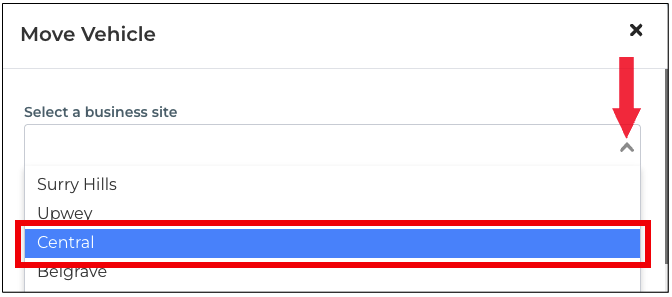
- Click the Submit button to continue moving the selected vehicle.


Add Vehicle Configuration
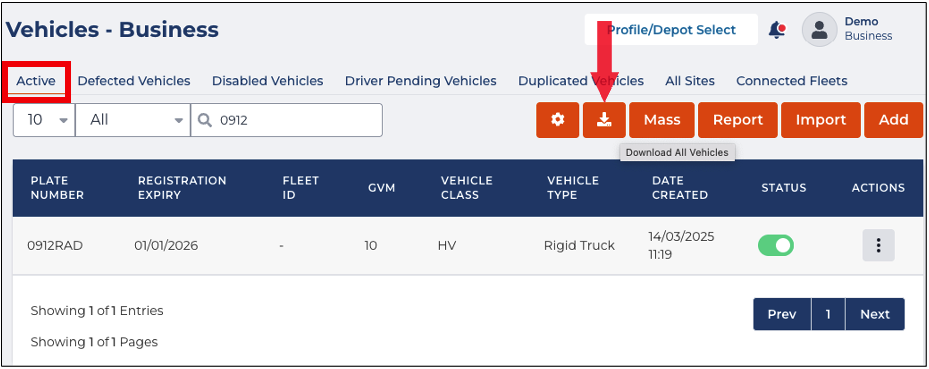
Download All Vehicles
This section will guide you on how to download the vehicle list and their information.
- In the BusinessNavigationMenu, click Vehicles and select VehiclesList.
- You will be directed to the Vehicles - Business page. When you access this page, the Active tab is open by default.
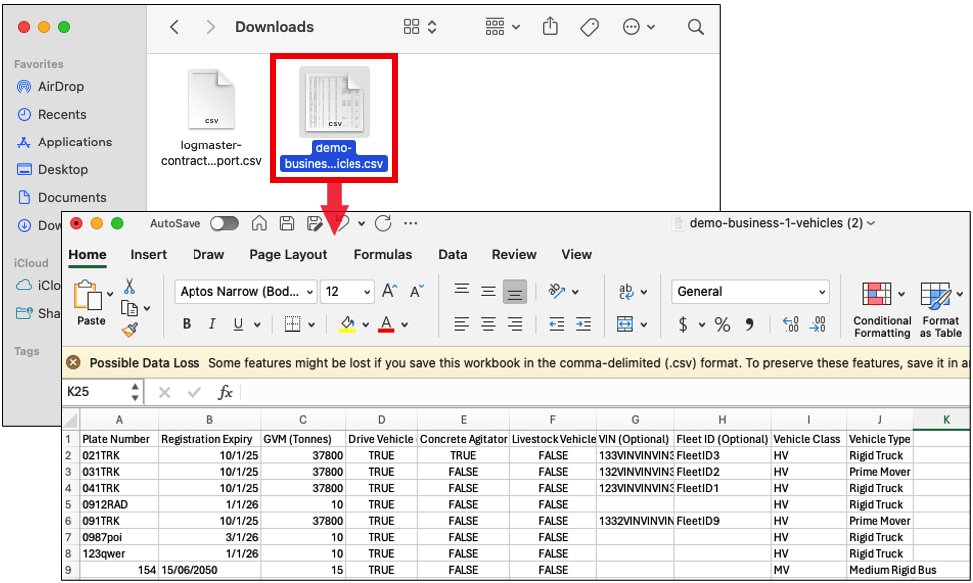
- Click the DownloadAllVehicles button. A CSV file will be downloaded to your device.
- On your device, find the Downloads folder and find the downloaded AllVehicles file.


View Vehicles - Mass Compliance
Vehicles - Mass Compliance Add/Remove Axle Groups
Generate Vehicle Reports
This section will guide you on how to generate and view vehicle reports. Generated vehicle reports can also be sent out to recipients' email addresses.
- In the Business Navigation Menu, click Vehicles and select Vehicles List.
- You will be directed to the Vehicles - Business page. When you access this page, the Active tab is open by default.
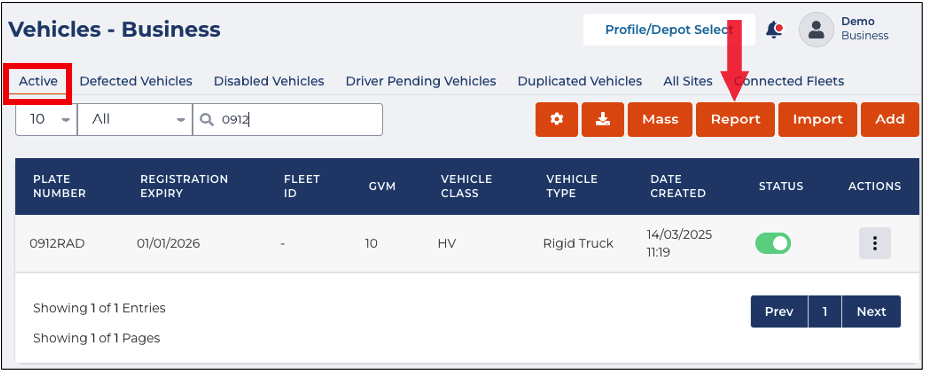
- Click the Report button. You will be directed to the Vehicles Report page.
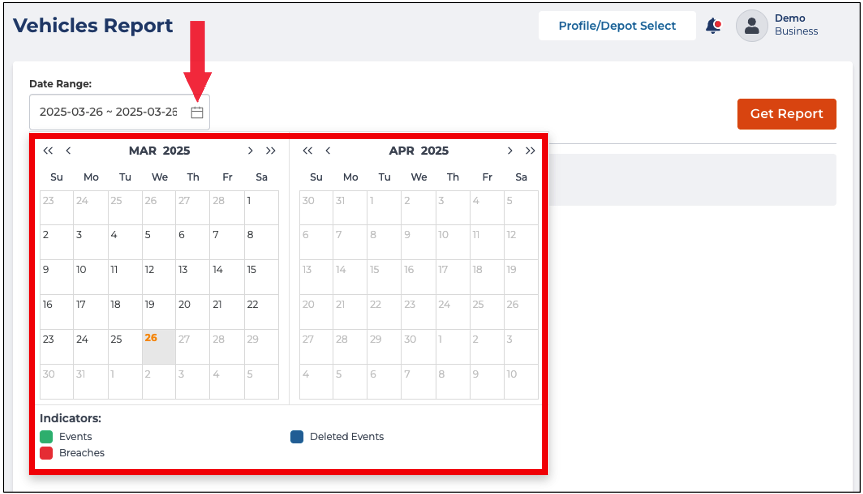
- In the Date Range field, click the Calendar icon to set the date range of the report you want to generate.
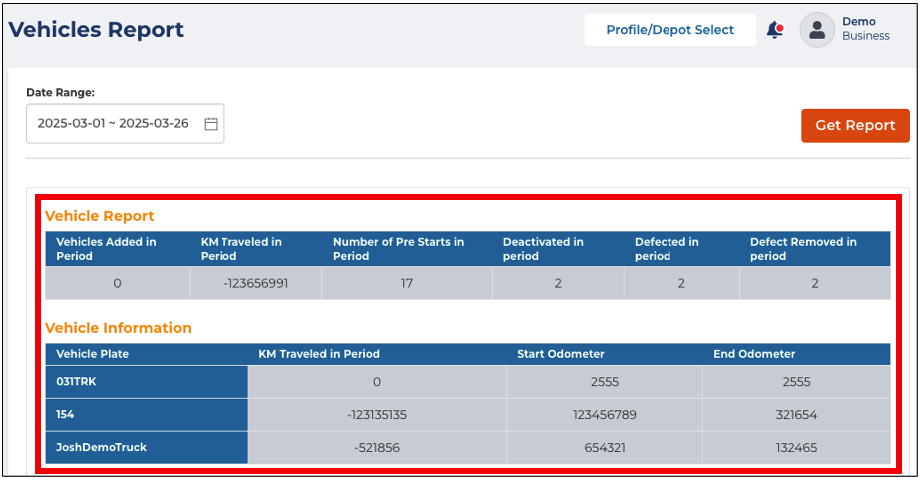
- After selecting the Date Range, the Vehicle Report and the Vehicle Information table displaying the report summary.
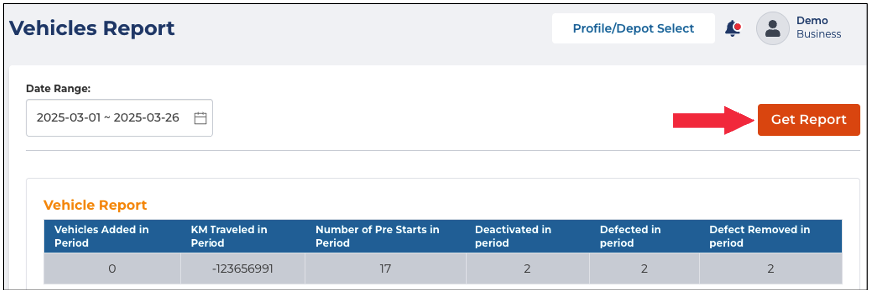
- To send the report to an email, click the Get Report button.
- The Send Report To Email dialog box will appear. In the Email address field, enter the recipient's email address.
- In the Report Date Range field, update the date range if necessary. The previously selected date range will appear in this field.
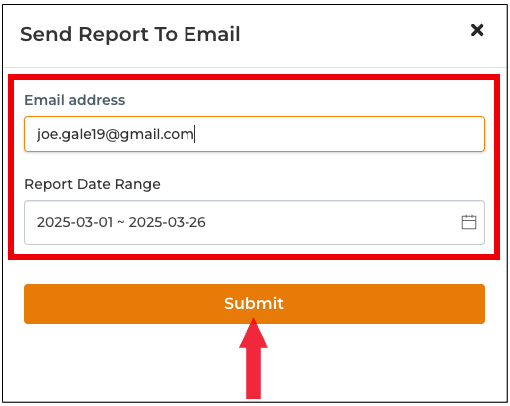
- Click the Submit button to continue.


Import Vehicles
This section will guide you on how to import multiple vehicles using a template where you can input the vehicles' information.
- In the Business Navigation Menu, click Vehicles and select Vehicles List.
- You will be directed to the Vehicles - Business page. When you access this page, the Active tab is open by default.
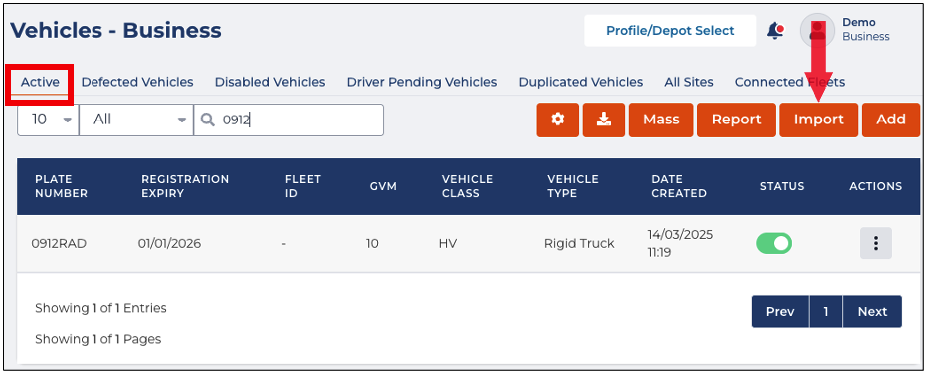
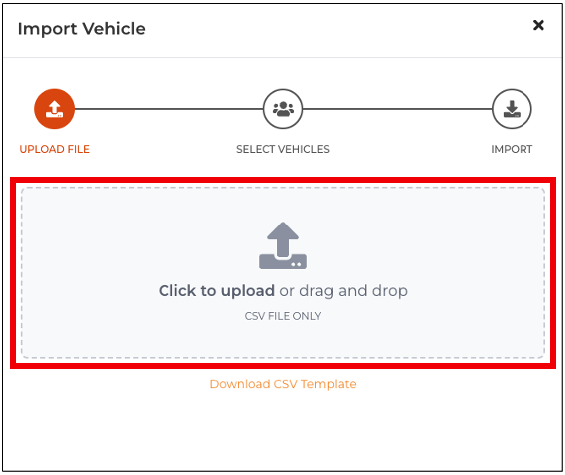
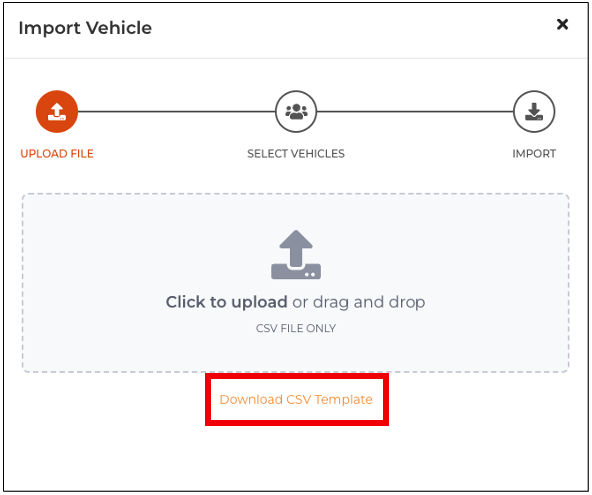
- Click the Import button. The Import Vehicle window will appear. Click the Upload Panel to access the File Location window in the UPLOAD FILE section.
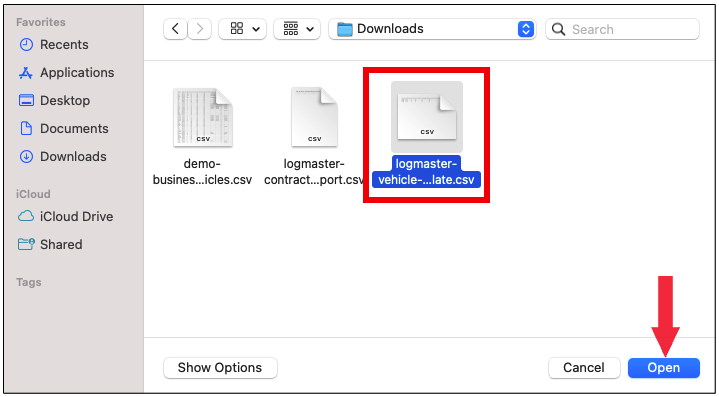
- In the File Location window, find and select the Vehicle List's CSV file. Click the Open button to continue.
- You will be directed to the SELECT VEHICLE section. In this section, a table with a list of vehicles will appear. Find the vehicles you want to import and select the Checkbox beside the vehicles' names.
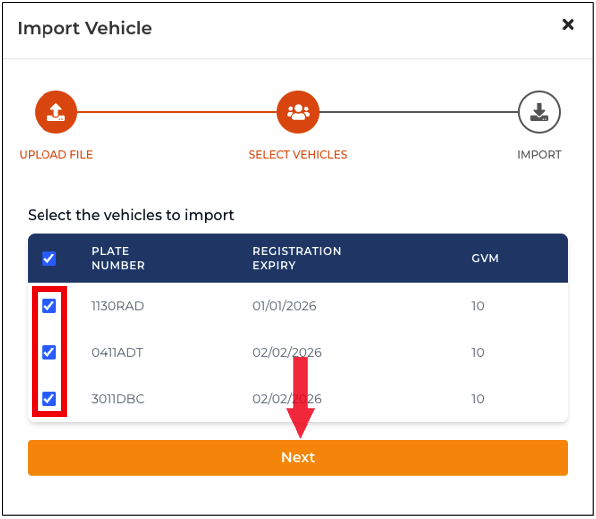
- Click the Next button to continue. You will be directed to the IMPORT section.
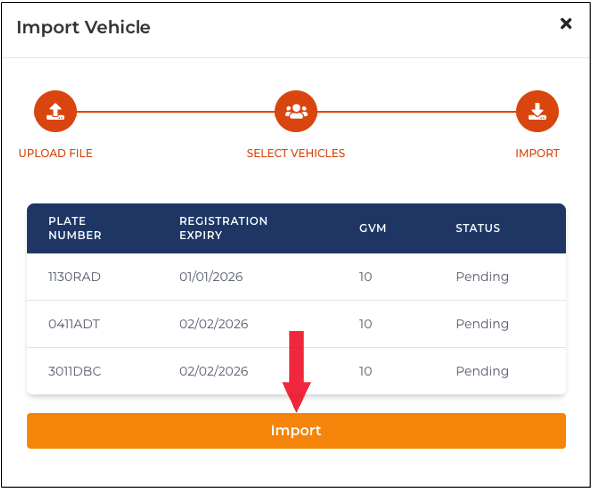
- Check the selected vehicle's information and status (Pending) from the table and click the Import button to proceed.
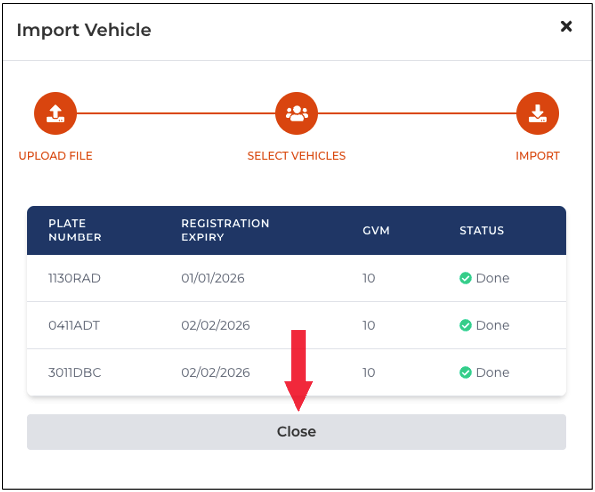
- After clicking the Import button, the Status should change to Done. Click the Close button to close the Import Vehicle window.


Download Vehicle CSV Template
This section will guide you on how to access and download the import vehicle via CSV template. Use this template to organize the list of vehicles and their details.
- In the Business Navigation Menu, click Vehicles and select Vehicles List.
- You will be directed to the Vehicles - Business page. When you access this page, the Active tab is open by default.
- Click the Import button. The Import Vehicle window will appear. Click the Download CSV Template link to download.
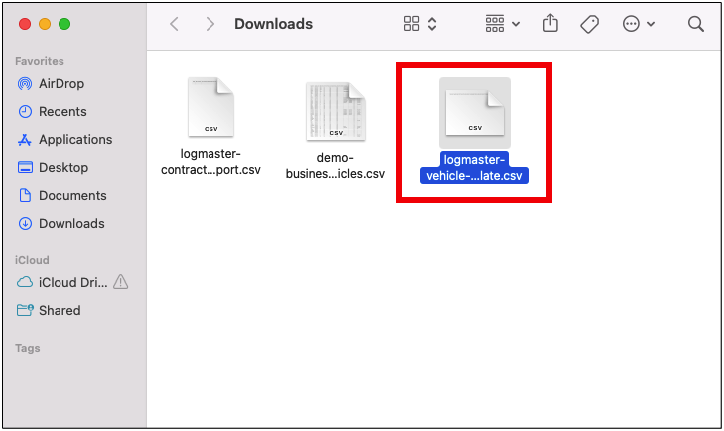
- The Vehicle CSV Template will be downloaded to your device. To access the downloaded file, go to your device's Downloads folder and open the downloaded vehicle CSV template file.
- The vehicle CSV template will need the following information:

- Plate Number
- Registration Expiry
- GVM (Tonnes)
- Driver Vehicle (Yes/No)
- Concrete Agitator (Yes/No)
- Livestock Vehicle (Yes/No)
- VIN (Optional)
- Fleet ID (Optional)
- Vehicle Class
- Vehicle Type


